Monday, December 8, 2014

Oracle EBS Shut Down Script for Windows

To Shut Down Application Server.
Let us assume that oracle is installed on c:\oracle
Navigate to Command prompt   Star>Run>Cmd
C:
cd\
cd oracle\PROD\inst\apps\PROD_r12\admin\scripts
adstpall
To Shut Down Database Services.
c:
cd\
cd C:\oracle\PROD\db\tech_st\11.1.0\appsutil\scripts\PROD_r12
addbctl stop immediate
To Shut Down Listner
c:
cd\
cd C:\oracle\PROD\db\tech_st\11.1.0\appsutil\scripts\PROD_r12
addlnctl stop prod

Wednesday, November 26, 2014

Develop a form using form developer and register with oracle application R12

There are two steps we will perform
  1. Develop a form using Oracle Forms Builder.
  2. Register the new developed form with oracle application  
Develop a form using Oracle Forms Builder.

Start → Run → frmbld

Connect the Oracle Forms Builder with database

File →Connect
 
Enter User Name, Password and Database and press connect button


We will develop a form using wizard

Right click on Module and choose Data Block Wizard


The Data Block Wizard welcome screen will appear to you and click next button with default options.


Select the type of Data Block like Table/ View / Store Procedure. I will go with default and click next button.


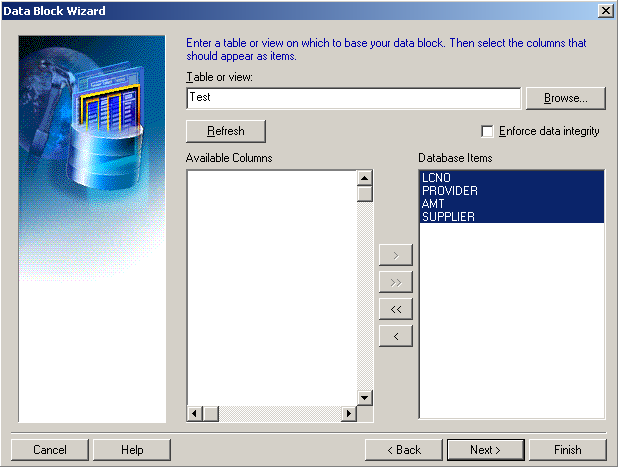
Browse/ type the table or view on which to base your data block. Click refresh button and make sure the columns should appear in available columns list.


Move all the Available columns to Database items list and click next button.


Enter the Name of your block and click next button.


You have finished the data block wizard steps and congratulation screen will appear. Click finished button with default settings.


After completing the Data Block wizard, the layout wizard welcome screen will appear. This wizard will allow you to quickly and easily lay out the item of a data block. The wizard will display the item in a frame on a canvas, and lay them out in one of several styles. Click next to begin creating your frame.


Select the canvas from canvas drop down on which you wish to lay out the data block’s items. Click next button.


Move the entire item from available items list to Display items list and Click next button.


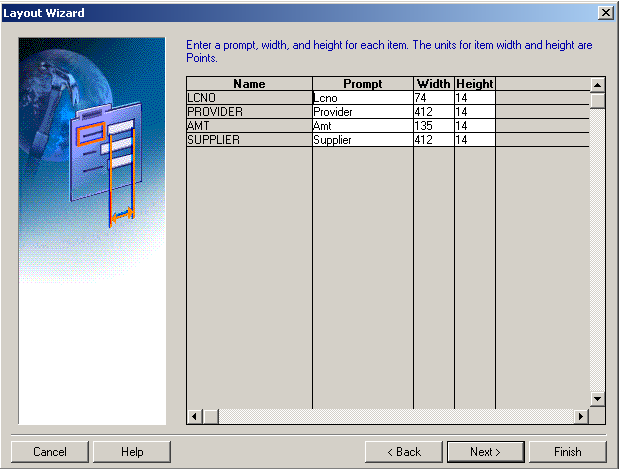
Enter a prompt, width and height for each item. Click next button.


Select the layout style for your frame by clicking the radio button below. I will go with default and click next button.


Enter a title for the frame and be sure to specify the number of database records to be displayed in the frame as well as distance.

 If you wish to display scroll in the frame then check the “Display Scrollbar” check box.
Click next button


You have finished the layout wizard steps and congratulation screen will appear. Now Click finished button with default settings.

After completing the layout wizard the below you will have below screen


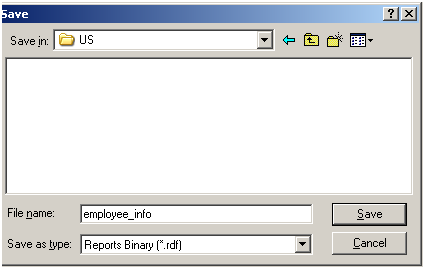
Save the form File → Save or press CTRL + S

Here is the screen which define the path.


Run the form press CTRL + R and fill up the data in columns.


Register the form with Oracle Application

Associate form to Application Forms

Application Developer → Application → Forms

Fill up columns as filled in below screen.


Save & close it

Associate form to Application Form Functions

Navigation:

Application Developer → Application → Form Functions

Fill up columns as filled in below screen.


Click on form tab and fill up information

Save & close it.

Associate Function to Menu

Navigation:

Application Developer → Application → Menu

Fill up columns as filled in below screen.


Save & close it.

Define Data Group

Navigation:

System Administrator → Security → Oracle → DataGroup

Fill up columns as filled in below screen.

Save & close it.

Define Responsibility and Assign Data Group

Navigation:

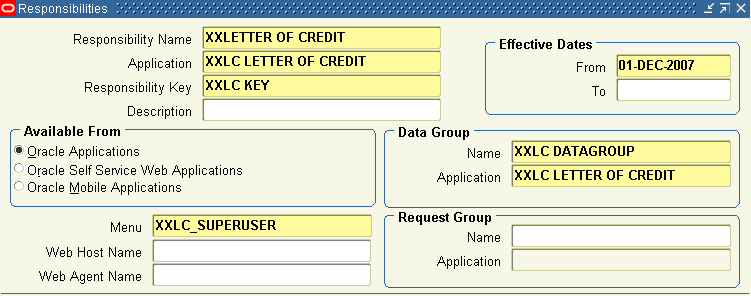
System Administrator → Security → Responsibility → Define

Fill up columns as filled in below screen.

Save & close it.

Attach responsibility to user

Navigation:

System Administrator → Security → User → Define

Fill up columns as filled in below screen.


Save & close it. Click on File menu and click on switch to responsibility and select your responsibility.


Save it.


Script/ Auto job to kill inactive sessions for more than 30 minutes


How to kill inactive sessions?

1. Create the procedure to select the sessions whose last call exceed 30 minutes and current status is in active.

CREATE OR REPLACE PROCEDURE PROC_KILL_INACTIVE_SESSION is

STMT VARCHAR2(1000);

BEGIN

 FOR X IN (
           SELECT SID, SERIAL# FROM V$SESSION
            WHERE STATUS = 'INACTIVE'
            AND (last_call_et / 60) > 30
          )
 LOOP

-- generate the script for killing in active sessions

   STMT := 'ALTER SYSTEM KILL SESSION ''' ||X.SID ||',' ||X.SERIAL# ||'''' ;
              DBMS_OUTPUT.PUT_LINE( STMT );
   EXECUTE IMMEDIATE STMT;
 END LOOP;

END;

2. Create an auto job to run after 30 minutes for killing inactive sessions

DECLARE
  X NUMBER;
BEGIN
  SYS.DBMS_JOB.SUBMIT
    ( job       => X
     ,what      => 'PROC_KILL_INACTIVE_SESSION;'
     ,next_date => to_date('01/01/4000 00:00:00','dd/mm/yyyy hh24:mi:ss')
     ,interval   => 'SYSDATE+30/1440'
     ,no_parse  => TRUE
    );
  SYS.DBMS_JOB.BROKEN
   (job    => X,
    broken => TRUE);
  SYS.DBMS_OUTPUT.PUT_LINE('Job Number is: ' || to_char(x));
END;
/

commit;


Friday, November 21, 2014

Create New Report and Registration with Oracle Application


Open Report Builder

Start → run → Rwbuilder


 Right click over Module 1 and choose report wizard

 
Choose the type of layout. I will choose create both web and paper layout and press next

Enter the title of report and choose the report style. I will choose tabular and press next.

Choose the data source type. I will choose SQL Query and press next.


Press Connect Button and enter username, Password and Database  and press connect button


Select the fields you would like to display in your report and press next.


Select the fields for which you would like to calculate the total and press next.


Select available field employee_number and press count button and press next.


Modify the labels and widths for your total as desired. I will go with default. Press next.


Choose the template for report. I will go with no template and press finished button.


Report layout will appear like this


Now we will register our new developed report with Oracle Application.

Open login page

User ID: SYSADMIN
Password: SYSADMIN

Press ‘Enter’ or Click on 'Login' Button.

Choose the responsibility  'System Administrator'


Now we will insert information in Concurrent Program Executable

Navigator →System Administrator →Concurrent → Program →Executable


Following page will display

Now we will enter the information as given below


Save & Close it.

Next step is to define the Concurrent Program

Navigator →System Administrator →Concurrent → Program →Define


Following page will display

Now we will enter the information in Concurrent program

 Save & Close it.

The request group we will define now.

Navigator →System Administrator →Security → Responsibility →Request


We will register our program


Save & Close it.

Now it is time to define responsibility

Navigator →System Administrator →Responsibility → Define


Click on define and below screen will display


Save & Close it.

Now we will add the responsibility to user

Navigator →System Administrator →Security →User→ Define