Software/Hardware Prerequisites:
Virtual Box
Windows Server 2003
Microsoft Visual C++
Perl (Active Perl)
MKS Toolkit or Cygwin
JDK
Oracle R12 E-Business Installer
Hardware: 1 CPU, 2.00 Ghz, with 2 GB of RAM. Oracle E-business suite with Vision
data takes 247.38 GB on disk. Its recommend more disk space should be available if want development tools on the same computer. 45 GB for database, 28 GB for Application Tier without the Vision Database.
Preparing OS/Installing prerequisite software:
1. Install Oracle Virtual Box goes with Virtual Box its free to download on local disk.
2. Install Windows 2003 Server and Install Lan Card driver if not auto plug & play.
3. Alter Installing/updating Windows Server 2003, Change computer name and domain. Set
computer name as EBS and domain oracleebs.com
Right click on ‘My Computer’ > Properties >Computer Name> Change
Set Computer Name to oracleebs.com
Click on More Set a Primary DNS Suffix of this Computer to oracleebs.com
4. Edit file C:/windows/system32/drivers/etc/hosts and add (ip address and computer name)
Example: 192.168.1.177 oracleebs.com
5. Logout from local administrator and login as oracle user before starting oracle E-business suite installer.
6. Install loopback adaptor
8. Install Microsoft Visual C++ 2008
Download and start setup for visual studio 2008
Select custom installation
Set product install path to c:\mvsc\
Select C++ and NET Framework SDK only
Right click on ‘My Computer’ > Properties >Advance>Environment Variables >scroll
down system variables list > Select Path > Edit > add C:\msv\VC\bin
9. Install Cygwin
You need to install MKS Tool Kit or cygwin. We go with cygwin its free download on
local disk and start cygwin installer (setup.exe ). If we select cygwin then we do not need gnumake or make with cygwin
Start the setup
Select Download without Installing and click Next
Set path where you want to save and click Next
Select Internet Connection type
Choose A Download Site i.e http://mirror.calvin.edu/ or select another from list and click Next
Select all default and following mandatory packages:
All cygwin default
Archive:
all default + zip
Base:
all default + ash/bash, coreutils, diffutils, findutils, gawk, grep, sed, tar and which
Devel:
all default + binutils, gcc, gcc-core, gcc-g++, make and mktemp (if it available)
Doc:
all default + cygwin-doc and man
Editors:
all defaults + vim
Interpreters:
all default + gawk
Shells:
all default + ash/bash and tcsh
Utils:
all default + cygutils and file
Click Next > Downloading will start wait till completion > click Finish
Once again start cygwin installer by clicking on setup.exe >
Select install from local directory > click Next >
Set root path c:\cygwing and click Next Select local package directory (where you download cygwin packages) click Next>
Now installer will start click Finish when completed.
Add C:\cygwing\bin directory to path variable – C:\> set path=%path%; C:\cygwing\bin
Copy gawk.exe awk.exe (delete existing awk.exe before copying can user xcopy)
copy grep.exe egrep.exe
copy make.exe gnumake.exe
copy gcc.exe cc.exe (delete existing cc.exe before copying)
10. Download and Install JDK (Java development Kit)
11. Login at http://edelivery.oracle.com/ > Continue >Select a Product Pack &
Platform >Go>Oracle E- Business Suite Release 12.1.1 Media Pack for Microsoft Windows (32-bit) Download following:
Microsoft Windows (32-bit) Rapid Install Start Here (Part 1,2,3,4)
Microsoft Windows (32-bit) Rapid Install RDBMS – Disk 1,2
Microsoft Windows (32-bit) Rapid Install Databases – Disk 1,2,3,4,5,6,7
Microsoft Windows (32-bit) Rapid Install Tools – Disk 1
Microsoft Windows (32-bit) Rapid Install APPL_TOP – Disk 1,2
12. Start the installation
Now just go directory StagesR12 and start installation.
D:\> cd StageR12\startCD\Disk1\rapidwiz
D:\> StageR12\startCD\Disk1\rapidwiz> RapidWiz.cmd
The rapid installation wizard will start, now follow installation wizrad
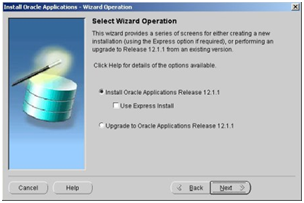
Select “Installl Oracle Application Release 12.1.1, then click “Next” botton.

Skip/Leave blank email id and support passward, if you have not then click “Next” botton.

Select the “Create a new configuration” option, then click the “Next” button.

Accept the default port pool by clicking the “Next” button.

Select the “Vision Demo Database” Enter Database SID, hostname, OS and base directory then click the “Next” button.
Note: Browse and select correct path for MKS (C:\cygwin\bin) and Microsoft visual studio(c:\msvc\VC\bin)

Virtual Box
Windows Server 2003
Microsoft Visual C++
Perl (Active Perl)
MKS Toolkit or Cygwin
JDK
Oracle R12 E-Business Installer
Hardware: 1 CPU, 2.00 Ghz, with 2 GB of RAM. Oracle E-business suite with Vision
data takes 247.38 GB on disk. Its recommend more disk space should be available if want development tools on the same computer. 45 GB for database, 28 GB for Application Tier without the Vision Database.
Preparing OS/Installing prerequisite software:
1. Install Oracle Virtual Box goes with Virtual Box its free to download on local disk.
2. Install Windows 2003 Server and Install Lan Card driver if not auto plug & play.
3. Alter Installing/updating Windows Server 2003, Change computer name and domain. Set
computer name as EBS and domain oracleebs.com
Right click on ‘My Computer’ > Properties >Computer Name> Change
Set Computer Name to oracleebs.com
Click on More Set a Primary DNS Suffix of this Computer to oracleebs.com
4. Edit file C:/windows/system32/drivers/etc/hosts and add (ip address and computer name)
Example: 192.168.1.177 oracleebs.com
5. Logout from local administrator and login as oracle user before starting oracle E-business suite installer.
6. Install loopback adaptor
In Control Panel,
double-click Add Hardware, and then click Next.
Click Yes,
I have already connected the hardware, and then click Next.
At the bottom of the Installed hardware list, click Add a new hardware device, and then click Next.
Click Install the hardware that I manually select from a list, and then click Next.
In the Common hardware types list, click Network adapters, and then click Next.
In the Manufacturers list box, click Microsoft.
In the Network Adapter list box, click Microsoft Loopback Adapter, and then click Next.
Click Next to start installing the drivers for your hardware.
Click Finish.
Click Start, click Settings, and then click Network Connections to verify.
7. Download Active Perl and run installer download. At the bottom of the Installed hardware list, click Add a new hardware device, and then click Next.
Click Install the hardware that I manually select from a list, and then click Next.
In the Common hardware types list, click Network adapters, and then click Next.
In the Manufacturers list box, click Microsoft.
In the Network Adapter list box, click Microsoft Loopback Adapter, and then click Next.
Click Next to start installing the drivers for your hardware.
Click Finish.
Click Start, click Settings, and then click Network Connections to verify.
8. Install Microsoft Visual C++ 2008
Download and start setup for visual studio 2008
Select custom installation
Set product install path to c:\mvsc\
Select C++ and NET Framework SDK only
Right click on ‘My Computer’ > Properties >Advance>Environment Variables >scroll
down system variables list > Select Path > Edit > add C:\msv\VC\bin
9. Install Cygwin
You need to install MKS Tool Kit or cygwin. We go with cygwin its free download on
local disk and start cygwin installer (setup.exe ). If we select cygwin then we do not need gnumake or make with cygwin
Start the setup
Select Download without Installing and click Next
Set path where you want to save and click Next
Select Internet Connection type
Choose A Download Site i.e http://mirror.calvin.edu/ or select another from list and click Next
Select all default and following mandatory packages:
All cygwin default
Click Next > Downloading will start wait till completion > click Finish
Once again start cygwin installer by clicking on setup.exe >
Select install from local directory > click Next >
Set root path c:\cygwing and click Next Select local package directory (where you download cygwin packages) click Next>
Now installer will start click Finish when completed.
Add C:\cygwing\bin directory to path variable – C:\> set path=%path%; C:\cygwing\bin
Copy gawk.exe awk.exe (delete existing awk.exe before copying can user xcopy)
copy grep.exe egrep.exe
copy make.exe gnumake.exe
copy gcc.exe cc.exe (delete existing cc.exe before copying)
10. Download and Install JDK (Java development Kit)
11. Login at http://edelivery.oracle.com/ > Continue >Select a Product Pack &
Platform >Go>Oracle E- Business Suite Release 12.1.1 Media Pack for Microsoft Windows (32-bit) Download following:
Microsoft Windows (32-bit) Rapid Install Start Here (Part 1,2,3,4)
Microsoft Windows (32-bit) Rapid Install RDBMS – Disk 1,2
Microsoft Windows (32-bit) Rapid Install Databases – Disk 1,2,3,4,5,6,7
Microsoft Windows (32-bit) Rapid Install Tools – Disk 1
Microsoft Windows (32-bit) Rapid Install APPL_TOP – Disk 1,2
12. Start the installation
Now just go directory StagesR12 and start installation.
D:\> cd StageR12\startCD\Disk1\rapidwiz
D:\> StageR12\startCD\Disk1\rapidwiz> RapidWiz.cmd
The rapid installation wizard will start, now follow installation wizrad

Select “Installl Oracle Application Release 12.1.1, then click “Next” botton.

Skip/Leave blank email id and support passward, if you have not then click “Next” botton.

Select the “Create a new configuration” option, then click the “Next” button.

Accept the default port pool by clicking the “Next” button.

Select the “Vision Demo Database” Enter Database SID, hostname, OS and base directory then click the “Next” button.
Note: Browse and select correct path for MKS (C:\cygwin\bin) and Microsoft visual studio(c:\msvc\VC\bin)

1. Click the “Next” button on node information screen
2. Select the “Suite Licensing” option, then click the “Next” button.
3. Accept the default products by clicking the “Next” button.
4. Select the appropriate country functionality, and then click the “Next” button.
5. Select the appropriate territory and characterset information, and then click the “Next” button.
6. Check the node configuration settings, and then click the “Next” button.
7. Accept the node information by clicking the “Next” button.
8. Wait for the system check status to complete.
9. Assuming all the system checks were completed successfully, click the “Next” button.
10. Click the “Next” button on the installation review screen.
11. Click the “Yes” button to start the installation.
12. Wait while the installation takes place.
13. Click the “Finish” button to exit the Rapid Install Wizard.
Once the installation is complete, the Rapid Installation Portal can be accessed using the following information.
URL: http://oracleebs.com:8000/OA_HTML/AppsLogin
Username: SYSADMIN
Password: SYSADMIN
No comments:
Post a Comment